Monday, November 1, 2021

Cathy and Momma Sassy try BLT DEVILED EGGS

BLT DEVILED EGGS

Mom  and I decided to do something different and thought deviled eggs was a good one.

We had all ingredients so thought we would give it a try.


INGREDIENTS

1 dozen hard-boiled eggs peeled

1/4 cup mayonnaise

1 tablespoon honey mustard -- we made our own

4 strips candied bacon diced small -- we used plain bacon

2 handfuls small cherry tomatoes quartered

1 handful basil leaves chopped -- we used dried basil

Chili powder to dust


We had the ingredients, adjusted the recipe for 3 eggs,  boiled the eggs and cooked bacon in microwave.


Funny story! Mom dumped the bacon on the paper towel. I said, "Make it nice." She shook her head. I said, "We are on Social media you know!" She tried to straighten it up. LOL!


INSTRUCTIONS

Slice each egg in half lengthwise and remove the yolk. Put all the yolks in a small mixing bowl and all the whites on a platter.

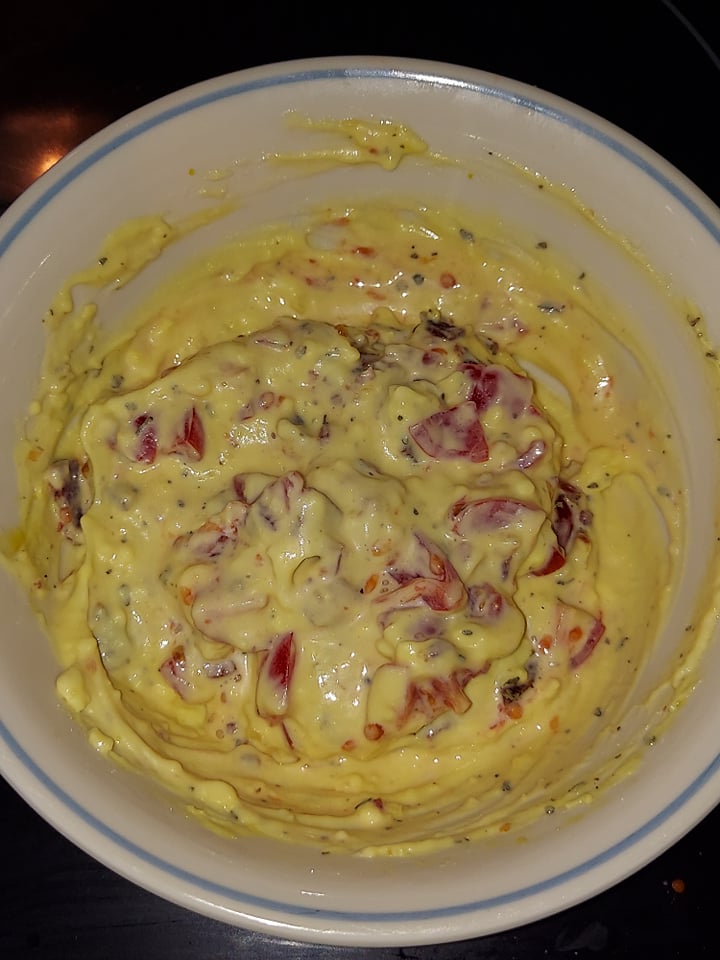
Add mayo and honey mustard to the yolks and mix until well combined and sort of fluffy.

Note: We advise adding honey mustard first then the mayo.

Fold in the diced bacon, tomatoes, and basil (reserving a little of the basil for a garnish)

Spoon filling into the centers of the whites. Garnish with basil and dust with chili powder.


After we mixed it together, we decided it is best to ad the honey mustard first and adjust the mayo after.  Too wet for us.


Not too pretty but tasted good. I am not a fan of the sweet deviled egg. Next time, I will leave the honey out of it and just used plain mustard.

Try it sometime and see what you think. 

Thanks to https://thestayathomechef.com/ for this easy recipe.

Link to this recipe --- https://thestayathomechef.com/blt-deviled-eggs/?fbclid=IwAR2Aq3cqJCK6N8cXgYVtRJ-NhE3Nt9YntB3g4r-KNGnisBm32qS91BhTPfA

Thanks,

Cathy and Momma Sassy

💓💓💓

Thank you for following us and if you haven't already subscribed to receive our weekly blog post, just click on the SUBSCRIBE button on the left of this page or use the pop-up box and you will be the first to find out what's going on in our sassy brains. 😉

Also, if you are interested in getting a weekly recipes, that have been tested and approved by one of us sisters, all you have to do is sign up to our blog and you will automatically receive a weekly recipe. Pass the word along 🍲

FTC DISCLAIMER: This blog post is NOT SPONSORED. All opinions are our own, honest opinions. The links are for easy access & if you choose to use these links we are in no way compensated.


Monday, October 25, 2021

Happy Halloween and NO Bones About It!! DIY Craft


This craft is simply cute and only takes a few items to make. My grandson loved it when I gave it to him, he said "It's HALLOWEEN?"  I gave it to him the day we made it, he's only 4 years old and has no concept of time. But that made me happy that he loved it. Thanks Cathy for suggesting this craft.

Here's what you will need:
Instructions:


Step 1: Gather all your supplies to make these as quick as possible.
Step 2: Push the marshmallow onto the end of one of your lollipop sticks. Make the skeleton face with a toothpick and the black candy wafers on the marshmallow. Allow it to dry fully before continuing. The candy typically dries pretty quickly.
Step 3: Take 5 pretzels that you will layer on the stick to create the bones. Then push a mini marshmallow on the stick under the bones to keep them from falling.
Step 4: Place the skeleton in the treat bag
Step 5: Punch a hole in the printable and use twine or string to attach the printable to the bag. VOILA! You are done.

Your friends and family or even trick-or-treaters will love this.

👻👻👻👻👻👻👻👻👻👻👻👻👻👻👻👻

Here is the link to our video where we made them on our YouTube LIVE show.

Thanks for the idea Just Add Confetti.


If you make this craft, we would love to see it. Tag us on Instagram, Facebook or Twitter and show us your creation.


Keep it sassy,

Kelly

👻👻👻👻👻👻👻👻👻👻👻👻👻👻👻👻


Thank you for reading our blog post. If you haven't already subscribed to receive our weekly blog post and Recipe of the Week, just click the SUBSCRIBE button on the right of the page and you will be the first to find out what's going on in our sassy brains. 😜  

The Recipe of the Week is a bonus for our subscribers and goes out via email mid-week. So, don't miss out, and SUBSCRIBE TODAY!


FTC DISCLAIMER:  This page informs you of our disclosure statement regarding the advertisements we use and disclosure of our Service and the choices we have associated with it. The compensation received will never influence the content, topics, or posts made in this blog. All advertising is in the form of advertisements generated by a third-party ad network or affiliates. Those advertisements will be identified as paid advertisements. The owner(s) of this website is not compensated to provide opinions on products, services, websites, and various other topics. The views and opinions expressed on this website are purely the owners. If we claim or appear to be experts on a certain topic or product or service area, we will only endorse products or services that we believe, based on our expertise, are worthy of such endorsement. Any product claim, statistic, quote, or other representation about a product or service should be verified with the manufacturer or provider. This website does not contain any content which might present a conflict of interest.

Monday, October 18, 2021

Baked Mexican Street Corn is yummy!


Baked Mexican Street Corn is a different way to eat fresh corn! We couldn't find the Cotija cheese so we used Feta instead. We both thought the dish was pretty good although Mom did not like the Feta cheese.

Here's what you need to make this tasty recipe:


Ingredients

  • 4 ears Corn
  • ½ cup Sour Cream
  • ½ cup Mayonnaise
  • ½ teaspoon Garlic Powder
  • 1 teaspoon Chili Powder
  • 1 ½ cups Cotija cheese crumbled

**NOTE: We did add some cilantro, lime zest and juice to the mixture because I noticed the other recipes were calling for it. 


Instructions
  1. Preheat the oven to 425 degrees F.
  2. In a small bowl, mix the sour cream, mayonnaise, garlic powder, and chili powder. (Plus, we added cilantro, lime zest and lime juice!) Cover and refrigerate until the corn is ready.
  3. Shuck the corn and remove all corn silk. Cover each ear of corn individually in foil, and wrap tightly. Place directly on the preheated oven rack and bake for 45 minutes.
  4. Remove the corn from the oven, unwrap the foil, and let the corn cool off for approximately 30 minutes. (If you skip this step, the sour cream/mayonnaise will just melt and NOT adhere the cheese to the corn!!!)
  5. Once the corn is mostly cooled, slather each ear in the sour cream / mayonnaise / spice mixture. Press the crumbled cheese into the corn on all sides.  

Recipe found here Basil and Bubbly


Baking is a great way to to cook corn. I'm glad we tried it!

Have you ever tried Mexican Street Corn? How'd you like it? We'd love to hear from you, just comment below.

Stay safe and healthy and
DON'T FORGET TO BRING YOUR SASS!

Cathy
Sassy Silver Sisters 
Cathy, Rhonda & Kelly

💓💓💓

Thank you for following us and if you haven't already subscribed to receive our weekly blog post, just click on the SUBSCRIBE button on the right of this page and you will be the first to find out what's going on in our sassy brains. 😉

Also, if you are interested in getting a weekly recipes, that have been tested and approved by one of us sisters, all you have to do is sign up to our blog and you will automatically receive a weekly recipe. Pass the word along 🍲


FTC DISCLAIMER: This blog post is NOT SPONSORED. All opinions are our own, honest opinions. The links are for easy access & if you choose to use these links we are in no way compensated.

Monday, October 11, 2021

Rodan + Fields Product Review


We have a long time social media follower & friend that is an independent consultant for Rodan + Fields. Jeanette has sent us sample products before and we loved them. She reached out to us again and said that she had some product samples we could try. She sent us samples of Enhancements Micro-Dermabrasion Paste & Active Hydration Body Replenish. The samples were sent in a pretty blue bag with instructions to the products.


The first product we sampled was the Rodan + Fields Enhancements Micro-Dermabrasion Paste. It is a face and body sugar and salt based scrub that gently buffs away dull skin cells and dry, flaky skin.


REVIEW: the first thing we noticed is the citrus scent. We applied it to our hands for testing purposes and after washing it off, it left our skin super silky and smooth. It didn't leave a greasy residue and our hands had a bright and vibrant glow. As we get older our skin tends to dry out and look like dried up leaves. Nobody wants that 😉 This product should only be used a couple of times of week. The price on the website is $83 but if you sign up for the PC Perks, you get a discount and other benefits.

+++++++++++++++++++++++

The last product we sampled was the Rodan + Fields Active Hydration Body Replenish. It is an all-over hydration lotion that supposedly gives you a younger-looking, younger-acting skin with their breakthrough body moisturizer that instantly and continuously hydrates.


REVIEW: we were told to exfoliate with the first product and use the Active Hydration Body Replenish after exfoliating. It didn't have much of a scent, which was the first thing we noticed. It wasn't greasy and made our hands feel super soft and look much younger. We would recommend this product along with the scrub. This product has $66 price tag but again, if you want to save a bit of cash, you can subscribe to their Perks program.

If you are so inclined to try any of the products, you can head over to her website Rodan + Fields .
+++++++++++++++++++++++

Check out our YouTube video with the full review on Rodan + Fields Enhancements Micro-Dermabrasion Paste & Active Hydration Body Replenish. 


Do you use Rodan + Fields? Do you have a favorite product? We'd love to hear from you! Comment below.

Do you have a product that you represent and  would like for us to try and review? You can use the contact form (on the left of this page) to send us a message and we will get back with you.

Stay safe & sassy!

Kelly

Sassy Silver Sisters 
Cathy, Rhonda & Kelly

💓💓💓

Thank you for following us and if you haven't already subscribed to receive our weekly blog post, just click on the SUBSCRIBE button on the left of this page and you will be the first to find out what's going on in our sassy brains. 😉

Also, if you are interested in getting a weekly recipes, that have been tested and approved by one of us sisters, all you have to do is sign up to our blog and you will automatically receive a weekly recipe. Pass the word along 🍲


FTC DISCLAIMER: This blog post is NOT SPONSORED. All opinions are our own, honest opinions. The links are for easy access & if you choose to use these links we are in no way compensated.


Monday, October 4, 2021

DIY Jack-O-Lantern Floral Centerpiece


I was looking for something different to make for the Halloween season and found this DIY on Pinterest. It  an easy craft and you can find all the items easily at your local Walmart, Dollar Tree and craft store. Let's get started!

Supplies:
Instructions:

The first thing I did was spray paint the pails. If I had thought more about it, I would have glued them all together first then spray painted. But I painted them all individually. You may want to seal them afterwards as I found out the paint didn't adhere as well as I thought. I might go back later and seal. 


It took a few coats to cover. It didn't take long between coats to dry. I left the handles on because it was easier to handle them and transport them back to my craft room and finish the project.


After a few hours of dry time, I painted the faces with a metallic paint. It took a couple of coats of paint to make it look super gold.


After all the paint was good and dry, I put a large rock in the bottom pail for stability.


I glued the pails together with hot glue and when along the outside after they were all together and added more glue.


Jute cord finished this project off and hid the messy glue. I tacked the cord at the ends with hot glue.


I had a bunch of fall silk flowers in my stash and used them to fill the top.


I'm super happy with this craft. As you can see I didn't line the faces up on purpose because I thought it would add a little character to the craft.

Check out the video on YouTube ...


If you decide to make something similar we would love to see it. Tag us on Instagram, Facebook or Twitter, and show us our creation.

🍁🍁🍁🍁🍁🍁🍁🍁🍁🍁🍁🍁🍁🍁🍁🍁🍁🍁🍁

Keep it sassy!

Kelly

Thank you for reading our blog post. If you haven't already subscribed to receive our weekly blog post and Recipe of the Week, just click the SUBSCRIBE button on the right of the page and you will be the first to find out what's going on in our sassy brains. 😜  

The Recipe of the Week is a bonus for our subscribers and goes out via email mid-week. So, don't miss out, and SUBSCRIBE TODAY!


FTC DISCLAIMER:  This page informs you of our disclosure statement regarding the advertisements we use and disclosure of our Service and the choices we have associated with it. The compensation received will never influence the content, topics, or posts made in this blog. All advertising is in the form of advertisements generated by a third-party ad network or affiliates. Those advertisements will be identified as paid advertisements. The owner(s) of this website is not compensated to provide opinions on products, services, websites, and various other topics. The views and opinions expressed on this website are purely the owners. If we claim or appear to be experts on a certain topic or product or service area, we will only endorse products or services that we believe, based on our expertise, are worthy of such endorsement. Any product claim, statistic, quote, or other representation about a product or service should be verified with the manufacturer or provider. This website does not contain any content which might present a conflict of interest.

Monday, September 27, 2021

Pumpkin Spice Snack Review

***UPDATED9/2/23***


On our most recent YouTube Live, we each brought to the table a Pumpkin Spice snack. We love our snacks, so why not try new and different snack foods to review and share our thoughts with you.

🍁🍁🍁🍁🍁🍁🍁🍁🍁🍁🍁🍁🍁🍁🍁🍁🍁🍁🍁

We started out with a cup of coffee and used Coffee Mate Pumpkin Spice Creamer. We decided that depending on how strong your coffee is, how much flavor comes through. I thought it was not creamy enough and we all thought we could taste the Pumpkin Spice flavor. 


You can find it at Walmart for $4.26 1 pint. Watch our review here. (place of purchase and price has been updated)

🍁🍁🍁🍁🍁🍁🍁🍁🍁🍁🍁🍁🍁🍁🍁🍁🍁🍁🍁

The next item we tried was Good & Gather Date and Nut Bars. The date flavor comes out right away and the spices were there right along with them. They were soft and chewy. We all agreed they were a  delicious fall treat. 


You can find them at Target for $4.29 - 5 bars.  NO LONGER AVAILABLE. Watch our YouTube Review here.

🍁🍁🍁🍁🍁🍁🍁🍁🍁🍁🍁🍁🍁🍁🍁🍁🍁🍁🍁

***NO LONGER AVAILABLE*** On to the next snack food, Clancy's Pumpkin Spice Yogurt Covered Pretzels. It was sweet, not super sweet, salty, and crunchy with a subtle Pumpkin Spice flavor.  I thought it had more of a vanilla flavor. We all think it was a good snack, just a little disappointed that the Pumpkin Spice flavor didn't come through.

You can find it at Aldi. Our YouTube Review here .

🍁🍁🍁🍁🍁🍁🍁🍁🍁🍁🍁🍁🍁🍁🍁🍁🍁🍁🍁

Our last snack was Stouffers Pumpkin Spice Snaps. They were crisp and we thought that the pumpkin spice flavor was not there, they actually tasted more like ginger snaps. We all agreed we needed to cleanse our pallets between snacks because we thought we lost the the spice flavor. These are delicious and crispy cookies. Good for dunking!

Found these Pumpkin Spice Snaps at Big Lots. Our YouTube Review here.

🍁🍁🍁🍁🍁🍁🍁🍁🍁🍁🍁🍁🍁🍁🍁🍁🍁🍁🍁

Overall, we enjoyed all the snacks and the creamer. We agreed the best Pumpkin Spice flavor came out in the Coffee Mate creamer. Good 'til the last drop. And the PRIZE goes to....Cathy!! She brought the creamer to taste.

Do you have a favorite Pumpkin Spice snack? We'd love to hear from you! Comment below.

Stay safe & sassy!

Kelly

Sassy Silver Sisters 
Cathy, Rhonda & Kelly

😃😃😃😃😃😃😃😃😃😃😃😃😃😃😃😃

Thank you for reading our blog post. If you haven't already subscribed to receive our weekly blog post and Recipe of the Week, just click the SUBSCRIBE button on the right of the page and you will be the first to find out what's going on in our sassy brains. 😜


The Recipe of the Week is a bonus for our subscribers and goes out via email mid-week.
So, don't miss out, and SUBSCRIBE TODAY!

FTC DISCLAIMER:  This page informs you of our disclosure statement regarding the advertisements we use and disclosure of our Service and the choices we have associated with it. The compensation received will never influence the content, topics, or posts made in this blog. All advertising is in the form of advertisements generated by a third-party ad network or affiliates. Those advertisements will be identified as paid advertisements. The owner(s) of this website is not compensated to provide opinions on products, services, websites, and various other topics. The views and opinions expressed on this website are purely the owners. If we claim or appear to be experts on a certain topic or product or service area, we will only endorse products or services that we believe, based on our expertise, are worthy of such endorsement. Any product claim, statistic, quote, or other representation about a product or service should be verified with the manufacturer or provider. This website does not contain any content which might present a conflict of interest.

Monday, September 20, 2021

Taste Test - Spinach Tomato Burgers Recipe


Momma Sassy and I decided to try a new recipe for burgers and we were pleasantly surprised! Check out the video which was live streamed on YouTube

While you are there -- subscribe and hit that notification bell! 🔔

Taste testing starts at 8:10
    

Spinach Tomato Burgers

TOTAL TIME: Prep/Total Time: 20 min.  YIELD: 4 servings

Ingredients

1 large egg, lightly beaten
2 tablespoons fat-free milk
1/2 cup soft bread crumbs
1 teaspoon dried basil
1/2 teaspoon salt
1/4 teaspoon pepper
1 pound lean ground beef (90% lean)
4 whole wheat hamburger buns, split
1/4 cup spinach dip
1/4 cup julienned soft sun-dried tomatoes (not packed in oil)
Lettuce leaves

Directions

1. Combine first 6 ingredients. Add beef; mix lightly but thoroughly. Shape into four 1/2-in.-thick patties.

2. Place burgers on an oiled grill rack or in a greased 15x10x1-in. pan. Grill, covered, over medium heat or broil 4-5 in. from heat until a thermometer reads 160°, 4-5 minutes per side. Grill buns, cut side down, over medium heat until toasted. Serve burgers on buns; top with spinach dip, tomatoes and lettuce.

 Found this recipe here ---Taste of Home

We hope you try this recipe and add your own special touches!

Do you have a special burger recipe? Share it with us!

Stay safe & sassy!

Cathy
Sassy Silver Sisters 
Cathy, Rhonda & Kelly

💓💓💓

Thank you for following us and if you haven't already subscribed to receive our weekly blog post, just click on the SUBSCRIBE button on the right of this page and you will be the first to find out what's going on in our sassy brains. 😉

Also, if you are interested in getting a weekly recipes, that have been tested and approved by one of us sisters, all you have to do is sign up to our blog and you will automatically receive a weekly recipe. Pass the word along 🍲

FTC DISCLAIMER: This blog post is NOT SPONSORED. All opinions are our own, honest opinions. The links are for easy access & if you choose to use these links we are in no way compensated.

Product Review Roundup May 2024

  Attention Product-Curious Consumers! Gather around for an unbiased roundup of the latest and greatest products, meticulously curated to he...