Showing posts with label DIY. Show all posts

Monday, December 13, 2021

DIY Easy Cinnamon Ornaments


I hope the holiday season is going wonderfully for you. I'm sure you've done all your decorating and have started on the cookies and treats. What a fun time of year, do you agree?

Today I'm going to share with you the most delicious-smelling homemade ornaments ever.   I've made these in the past and let me tell you, it will be a staple on your tree for years to come.

These Easy Cinnamon Ornaments are a simple & fun craft for kids (and kids at heart) that smell amazing hanging on your Christmas tree.

This particular recipe comes from McCormick.


INGREDIENTS 15 Servings 
INSTRUCTIONS
  1. Preheat oven to 200°F. Mix applesauce and cinnamon in a small bowl until a smooth ball of dough is formed. (You may need to use your hands to incorporate all of the cinnamon.) Using about 1/4 of the dough at a time, roll dough to 1/4-inch to 1/3-inch thickness between two sheets of plastic wrap. Peel off the top sheet of plastic wrap. Cut dough into desired shapes with 2- to 3-inch cookie cutters. Make a hole at top of the ornament with a drinking straw or skewer. Place ornaments on a baking sheet. 
  2. Bake 2 1/2 hours. Cool ornaments on wire rack. (Or, to dry ornaments at room temperature, carefully place them on a wire rack. Let stand 1 to 2 days or until thoroughly dry, turning occasionally.)
  3. Insert ribbon through holes and tie to hang. Decorate with opaque paint markers, found in arts and crafts stores, if desired.
TIPS AND TRICKS

Test Kitchen Tip: Or use 1 bottle (4.12 ounces) McCormick® Ground Cinnamon. If a larger size bottle of cinnamon is used, measure 1 cup plus 2 tablespoons cinnamon.

🎄🎄🎄🎄🎄🎄🎄🎄🎄🎄🎄🎄🎄🎄🎄🎄🎄🎄🎄🎄🎄🎄🎄🎄🎄🎄🎄

Have you ever made these cinnamon ornaments? If you haven't I hope this DIY gives you some incentive to make these incredible smelling ornaments.  Please comment below.

Stay safe & sassy!
Kelly
Sassy Silver Sisters 
Cathy, Rhonda & Kelly

💓💓💓

Thank you for following us and if you haven't already subscribed to receive our weekly blog post, just click on the SUBSCRIBE button on the left of this page and you will be the first to find out what's going on in our sassy brains. 😉

Also, if you are interested in getting a weekly recipe, that has been tested and approved by one of us sisters, all you have to do is sign up to our blog and you will automatically receive a weekly recipe. Pass the word along 🍲

FTC DISCLAIMER: This blog post is NOT SPONSORED. All opinions are our own, honest opinions. The links are for easy access & if you choose to use these links we are in no way compensated.


Monday, October 4, 2021

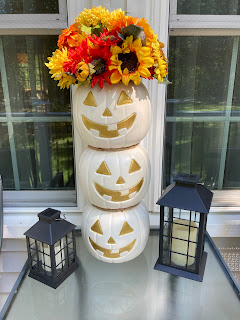
DIY Jack-O-Lantern Floral Centerpiece


I was looking for something different to make for the Halloween season and found this DIY on Pinterest. It  an easy craft and you can find all the items easily at your local Walmart, Dollar Tree and craft store. Let's get started!

Supplies:
Instructions:

The first thing I did was spray paint the pails. If I had thought more about it, I would have glued them all together first then spray painted. But I painted them all individually. You may want to seal them afterwards as I found out the paint didn't adhere as well as I thought. I might go back later and seal. 


It took a few coats to cover. It didn't take long between coats to dry. I left the handles on because it was easier to handle them and transport them back to my craft room and finish the project.


After a few hours of dry time, I painted the faces with a metallic paint. It took a couple of coats of paint to make it look super gold.


After all the paint was good and dry, I put a large rock in the bottom pail for stability.


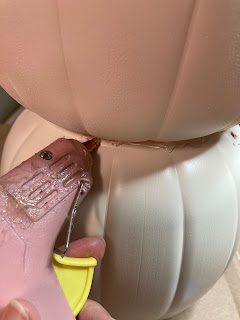
I glued the pails together with hot glue and when along the outside after they were all together and added more glue.


Jute cord finished this project off and hid the messy glue. I tacked the cord at the ends with hot glue.


I had a bunch of fall silk flowers in my stash and used them to fill the top.


I'm super happy with this craft. As you can see I didn't line the faces up on purpose because I thought it would add a little character to the craft.

Check out the video on YouTube ...


If you decide to make something similar we would love to see it. Tag us on Instagram, Facebook or Twitter, and show us our creation.

🍁🍁🍁🍁🍁🍁🍁🍁🍁🍁🍁🍁🍁🍁🍁🍁🍁🍁🍁

Keep it sassy!

Kelly

Thank you for reading our blog post. If you haven't already subscribed to receive our weekly blog post and Recipe of the Week, just click the SUBSCRIBE button on the right of the page and you will be the first to find out what's going on in our sassy brains. 😜  

The Recipe of the Week is a bonus for our subscribers and goes out via email mid-week. So, don't miss out, and SUBSCRIBE TODAY!


FTC DISCLAIMER:  This page informs you of our disclosure statement regarding the advertisements we use and disclosure of our Service and the choices we have associated with it. The compensation received will never influence the content, topics, or posts made in this blog. All advertising is in the form of advertisements generated by a third-party ad network or affiliates. Those advertisements will be identified as paid advertisements. The owner(s) of this website is not compensated to provide opinions on products, services, websites, and various other topics. The views and opinions expressed on this website are purely the owners. If we claim or appear to be experts on a certain topic or product or service area, we will only endorse products or services that we believe, based on our expertise, are worthy of such endorsement. Any product claim, statistic, quote, or other representation about a product or service should be verified with the manufacturer or provider. This website does not contain any content which might present a conflict of interest.

Monday, August 23, 2021

DIY Over the Door Sign


This DIY over the door sign is simple and a quick way to decorate over any door in your house. I was looking for some scripture signs to put over two open doorways in our home and after researching, I thought why not make them. I have a Cricut Explore Air & vinyl, all I needed was the wood and paint.


I found the unfinished wood at Home Depot.  I bought two 1 in. x 4 in. x 39” Spruce/Pine/Fir Common Board Bed Slats @ $2.96 a piece. 

The paint I bought at Walmart, Waverly Inspirations Ultra Matte White for $6.54. 


The vinyl I used was Cricut removable vinyl. It actually wasn’t easy to remove when I made a mistake, that was disappointing. 

The 2” font was Courgette and I cut black vinyl. I had to make it fit on the 12” x 12” vinyl sheet. After cutting it out with my Cricut Explore Air, I cut sections of the words and used transfer paper to adhere to the painted wood. 


As far as the removeable vinyl goes, it didn’t want to remove when I made a mistake. OOPS! Oh well, we will see how long it will last until I can't stand looking at my mistakes. 🤣 

To hang them I used 3M Command strips which, with my experience, usually work very well .


What are your thoughts? Would you try and make something similar? We’d love to hear from you, please comment below.

Stay safe & sassy!
Kelly
Sassy Silver Sisters 
Cathy, Rhonda & Kelly

💓💓💓

Thank you for following us and if you haven't already subscribed to receive our weekly blog post, just click on the SUBSCRIBE button on the right of this page and you will be the first to find out what's going on in our sassy brains. 😉

Also, if you are interested in getting a weekly recipes, that have been tested and approved by one of us sisters, all you have to do is sign up to our blog and you will automatically receive a weekly recipe. 🍲


FTC DISCLAIMER: This blog post is NOT SPONSORED. All opinions are our own, honest opinions. The links are for easy access & if you choose to use these links we are in no way compensated.

Monday, August 16, 2021

Cathy Loves this Easy Tortilla Pizza Recipe

***UPDATED 8/5/23***


I am ALL about how to get by easily and cheaply. So, this is a recipe I tried and I love it.  You can make it your own special way by adding the ingredients you want. What I liked best was the tortilla is thin.


I made 2 because I can! 🤣I did a taste test on my every Monday LIVE stream on our YouTube channel.

Catch the video here...YouTube Channel

NOTE: Subscribe to our channel while you are there and hit the notification bell! 

The recipe and instructions can be found here --- Allrecipes.com

If you are looking for a snack idea, this is a good one!

Keep it Sassy, 
Cathy

🍕🍕🍕🍕🍕🍕🍕🍕🍕🍕🍕🍕🍕🍕🍕🍕🍕🍕🍕

Thank you for reading our blog post. If you haven't already subscribed to receive our weekly blog post and Recipe of the Week, just click the SUBSCRIBE button on the right of the page and you will be the first to find out what's going on in our sassy brains. 😜

The Recipe of the Week is a bonus for our subscribers and goes out via email mid-week.
So, don't miss out, and SUBSCRIBE TODAY!

FTC DISCLAIMER:  This page informs you of our disclosure statement regarding the advertisements we use and disclosure of our Service and the choices we have associated with it. The compensation received will never influence the content, topics, or posts made in this blog. All advertising is in the form of advertisements generated by a third-party ad network or affiliates. Those advertisements will be identified as paid advertisements. The owner(s) of this website is not compensated to provide opinions on products, services, websites, and various other topics. The views and opinions expressed on this website are purely the owners. If we claim or appear to be experts on a certain topic or product or service area, we will only endorse products or services that we believe, based on our expertise, are worthy of such endorsement. Any product claim, statistic, quote, or other representation about a product or service should be verified with the manufacturer or provider. This website does not contain any content which might present a conflict of interest.

Monday, July 5, 2021

Summer Craft Time Using Seashells - Sand and Sea Flower Pots


We girls recently made these on our YouTube LIVE. They are easy, quick, and a great use of seashells. I have a stash of seashells from all my beach trips so I shared them with my sisters. This craft is great for kids and a wonderful way to use the shells they have collected.

Here's what you will need:


Instructions:

  1. Get all your supplies ready to go. Hot glue on & sand in the tray.
  2. Cover your pot with glue then roll it in sand.
  3. When it’s dry you can use hot glue (for an inside pot) or a stronger adhesive like E600 (for an outdoor pot) to embellish your pot with shells.
  4. You can spray it with a clear sealant if you like.
NOTEBefore placing the shells on the pot, we decided to mark the pot first with a marker, then glued the sand on the pot.

Where to buy these products: The terracotta pot, glue gun & clear sealant you can find at Walmart, and the other items at Dollar Tree.

See how we made these on YouTube at around 23 minutes into the video.

Thanks to The V Spot for the idea!! 

We hope you enjoyed this post. Comment below and let us know what you think about this craft. Maybe even give us some ideas on using all those seashells.

Keep it sassy,
Kelly
Sassy Silver Sisters

😊😊😊😊😊😊😊😊😊😊😊😊😊😊😊😊

Thank you for reading our blog post. If you haven't already subscribed to receive our weekly blog post and Recipe of the Week, just click the SUBSCRIBE button on the right of the page and you will be the first to find out what's going on in our sassy brains. 😜

The Recipe of the Week is a bonus for our subscribers and goes out via email mid-week.
So, don't miss out, and SUBSCRIBE TODAY!

FTC DISCLAIMER:  This page informs you of our disclosure statement regarding the advertisements we use and disclosure of our Service and the choices we have associated with it. The compensation received will never influence the content, topics, or posts made in this blog. All advertising is in the form of advertisements generated by a third-party ad network or affiliates. Those advertisements will be identified as paid advertisements. The owner(s) of this website is not compensated to provide opinions on products, services, websites, and various other topics. The views and opinions expressed on this website are purely the owners. If we claim or appear to be experts on a certain topic or product or service area, we will only endorse products or services that we believe, based on our expertise, are worthy of such endorsement. Any product claim, statistic, quote, or other representation about a product or service should be verified with the manufacturer or provider. This website does not contain any content which might present a conflict of interest.

Monday, March 1, 2021

10 DIY Spring Wreath Ideas

***UPDATED 3/9/24***


🍀MARCH is here!! Spring is around the corner. Brighten up your front door with these creative DIY spring wreaths. There are floral wreaths, an umbrella wreath, a rain boot wreath, a monogram wreath, and much more.

We hope these ideas get your creative juices flowing. We give credit where credit is due so check out the links below the photos and let the designers know you visited their website.

🌷🌷🌷🌷🌷🌷🌷🌷🌷🌷🌷🌷🌷🌷🌷🌷🌷🌷🌷

If this wreath isn't full and beautiful. A tulip wreath will brighten any door.

Tulip Wreath DIY - Gorgeous and Easy! • The How To Mom

How cute is this umbrella wreath? So fast, easy, and creative.

DIY 5-Minute Umbrella "Wreath" (onegoodthingbyjillee.com)

Do you have a pair of rain boots just sitting around? This is a great way to use them to decorate your front door for spring.

https://pinkpopdesign.com/rain-boot-wreath/


Personalize your front door with this monogram wreath. 


Make A Monogram - daisymaebelle | daisymaebelle

  • ***************************************************************************

Would you like to help us do reviews? Here's a link to our 
  • wishlist on Amazon.com. We have items starting as low as $6. 

    ***************************************************************************

Do you love the farmhouse look? Then this is the wreath for you! 


Wagon Wheel Farmhouse Style Wreath Tutorial - Lydi Out Loud

This cute watering can wreath is fast and easy. Less than 10 minutes to put together.


Spring Watering Can Wreath! (tatertotsandjello.com)

A 5 minute DIY wreath will bring spring to your front door. 


How To Make An Easy 5-minute DIY Spring Wreath - Anika's DIY Life

This lush DIY boxwood wreath filled with butterflies and dotted with baby’s breath is the essence of spring!  I just might make this one because I already have the boxwood wreath.


Spring Boxwood Butterfly Wreath | Fun365 (orientaltrading.com)

Oh my goodness! This wreath is adorable and fairly simple to make. I just love the little bird's nest. 


Simply Spring: A DIY Wreath (onsuttonplace.com)

Do you love fairy gardens? Try making this DIY fairy garden wreath for your front door.  It adds that little touch of whimsy and much needed in the times we are living in these days. RIGHT?


DecoArt Blog - Crafts - DIY Fairy Garden Wreath

We hope you enjoyed these DIY wreath ideas. Do you have a wreath that you've made for the spring? We'd love for you to share it with us. Can't get enough ideas for a spring wreath project.

Keep it sassy,
Kelly

❁❁❁❁❁❁❁❁❁❁❁❁❁❁❁❁❁❁❁❁❁❁❁❁❁❁❁❁❁❁❁❁❁❁❁❁

Thank you so much for taking the time to read our blog! We really appreciate it. We believe that our blog is a great way to share valuable information, such as tips, tricks, and advice, to help our readers improve their lives. We strive to create content that is interesting, informative, and entertaining so that our readers can always find something valuable to read. We do our best to provide content that is timely and relevant, so our readers can stay up to date with the latest trends. We also aim to provide content that is unique and engaging, so our readers can learn something new and be inspired. We hope that our blog provides you with the necessary information and resources to make your life easier and more enjoyable. Thank you again for taking the time to read our blog!

FTC DISCLAIMER:  This page informs you of our disclosure statement regarding the advertisements we use and disclosure of our Service and the choices we have associated with it. The compensation received will never influence the content, topics, or posts made in this blog. All advertising is in the form of advertisements generated by a third-party ad network or affiliates. Those advertisements will be identified as paid advertisements. The owner(s) of this website is not compensated to provide opinions on products, services, websites, and various other topics. The views and opinions expressed on this website are purely the owners. If we claim or appear to be experts on a certain topic or product or service area, we will only endorse products or services that we believe, based on our expertise, are worthy of such endorsement. Any product claim, statistic, quote, or other representation about a product or service should be verified with the manufacturer or provider. This website does not contain any content that might present 

Monday, October 19, 2020

Cathy's Homemade Wrinkle Release Spray for Clothing

 ***UPDATED 7/8/23***


Cathy's Homemade Wrinkle Release Spray for Clothing 

I sell clothing online and sometimes they are extremely wrinkled. Plus, I use this for my own clothing. I have been using this recipe for about 3 years now and works great for me. This is simple and inexpensive.

 Recipe:

  •       14 oz spray bottle
  •       12 oz of water
  •       1 tsp fabric softener
  •       1 tsp alcohol 

Instructions: 

  1. Mix all ingredients by shaking.
  2. Hang the clothing up on a hanger, I hang mine in the shower. 
  3. Spray generously on those stubborn wrinkles and stretch the fabric at the wrinkle to straighten.  
  4. Let dry overnight.

So easy! I hope you will try this and save money because those wrinkle-release sprays purchased in the store are expensive.

Let us know if you have tried this recipe or have one of your own. Comment and share your thoughts.


Stay safe and healthy,

Cathy
The Sassy Silver Sisters
Cathy, Rhonda & Kelly

👕👕👕👕👕👕👕👕👕👕👕👕👕👕👕👕


Thank you for reading our blog post. If you haven't already subscribed to receive our weekly blog post and Recipe of the Week, just click the SUBSCRIBE button on the right of the page and you will be the first to find out what's going on in our sassy brains. 😜

The Recipe of the Week is a bonus for our subscribers and goes out via email mid-week.
So, don't miss out, and SUBSCRIBE TODAY!

FTC DISCLAIMER:  This page informs you of our disclosure statement regarding the advertisements we use and disclosure of our Service and the choices we have associated with it. The compensation received will never influence the content, topics, or posts made in this blog. All advertising is in the form of advertisements generated by a third-party ad network or affiliates. Those advertisements will be identified as paid advertisements. The owner(s) of this website is not compensated to provide opinions on products, services, websites, and various other topics. The views and opinions expressed on this website are purely the owners. If we claim or appear to be experts on a certain topic or product or service area, we will only endorse products or services that we believe, based on our expertise, are worthy of such endorsement. Any product claim, statistic, quote, or other representation about a product or service should be verified with the manufacturer or provider. This website does not contain any content which might present a conflict of interest.

Monday, September 21, 2020

De-skunking Our Dog and Home

***UPDATED 9/2/23***


Recently my dog had an encounter with a skunk. YES, a skunk. He went out for his 5 a.m. morning pee break and came back in before we knew he was sprayed by a skunk and headed directly to our grandson's room, luckily our grandson wasn't in there and rubbed his face all over his bed. Not knowing that my husband was dealing with this, he decided to wake me up after he had already given him his first bath. We bathed him 3 times that morning and took him to the groomers mid-afternoon. 

For the second bath, I did a little research on what to bathe him in and found a homemade solution from The Prairie Homestead, which worked a bit but didn't do the trick that I would have liked.

Here's the recipe if you are interested in DIY:

  • 1 quart of 3% hydrogen peroxide (this is the kind you find in the first aid section of your average grocery store. It’s very cheap.)
  • 1/4 cup baking soda
  • 1-2 drops of liquid dish soap (optional)
  • 2-3 drops of lemon essential oil (optional–but adds extra deodorizing power)
  • Rubber Gloves (optional, but highly recommended…)
  • Bucket

Make sure you wear gloves! Mix together the peroxide, baking soda, and dish soap. Stir well and then quickly apply to the dry dog, being careful not to splash any in his eyes. Thoroughly work the solution in his coat. It should cover and permeate as much of the hair as possible.

Allow the dog to “soak” for around 5 minutes.

A chemical reaction is occurring which actually neutralizes the odor. This is why you must use it before the peroxide and soda are finished with their reaction. It can not be made ahead of time and stored.

After the waiting period, thoroughly rinse the dog with water.


For the third bath, I took a trip to PetSmart and found this product Nature's Miracle® Skunk Odor Remover. It did take more of the smell away from the dog and it worked rather well on clothing and our carpets. This particular bottle has a lavender scent. Follow the instructions on the bottle.

I put this in a spray bottle and sprayed the house with it and it did help temporarily. I added it to my shampooer and shampooed my rugs. I do believe that helps a lot.

I also found a DIY to try and neutralize the smell in the house from Simply Earth using essential oils and a diffuser. It makes the home smell wonderful. I didn't have the Lemon Eucalyptus or the Blood Orange essential oil so I substituted it with Lemon, Eucalyptus, and a Citrus blend.


Defeat the Reek Diffuser Blend Recipe

Ingredients

Instructions

  • Add essential oils to the diffuser and diffuse in an open room.
  • To make a masterblend of this recipe use a 5 mL bottle from your Big Bonus Box and add 25 drops of Clove Essential Oil, 25 drops of Lemon Eucalyptus Essential Oil, and 50 Blood Orange Essential Oil. Shake to mix and label. 

We can still smell the skunk on his face after a week but the house smells so much better now. 
Another thing to consider when opening windows, make sure you don't open the windows that are near the spray spot. We found out the hard way and we couldn't figure out why it kept smelling like a skunk in our bedroom and determined the skunk sprayed our dog near our bedroom window. Live and learn! :)

I hope and pray you never encounter a skunk but if you or your pet get sprayed just maybe these tips will help you on your journey to de-skunking :)

If you have helpful tips on this subject, we would be glad to hear from you. Please comment!

Stay safe and healthy,
     Kelly
The Sassy Silver Sisters
Cathy, Rhonda & Kelly

😃😃😃😃😃😃😃😃😃😃😃😃😃😃😃😃

Thank you for reading our blog post. If you haven't already subscribed to receive our weekly blog post and Recipe of the Week, just click the SUBSCRIBE button on the right of the page and you will be the first to find out what's going on in our sassy brains. 😜


The Recipe of the Week is a bonus for our subscribers and goes out via email mid-week.
So, don't miss out, and SUBSCRIBE TODAY!

FTC DISCLAIMER:  This page informs you of our disclosure statement regarding the advertisements we use and disclosure of our Service and the choices we have associated with it. The compensation received will never influence the content, topics, or posts made in this blog. All advertising is in the form of advertisements generated by a third-party ad network or affiliates. Those advertisements will be identified as paid advertisements. The owner(s) of this website is not compensated to provide opinions on products, services, websites, and various other topics. The views and opinions expressed on this website are purely the owners. If we claim or appear to be experts on a certain topic or product or service area, we will only endorse products or services that we believe, based on our expertise, are worthy of such endorsement. Any product claim, statistic, quote, or other representation about a product or service should be verified with the manufacturer or provider. This website does not contain any content which might present a conflict of interest.

Delicious and Crowd-Pleasing Memorial Day Recipes

Memorial Day weekend holds a special significance, marking the unofficial commencement of summer and a time for reflection and remembrance. ...