Showing posts with label DIY. Show all posts

Sunday, November 13, 2022

DIY Wood Slice Christmas Ornaments


These gorgeous napkin ornaments are simply easy to make. Within a few minutes, you can learn how to make napkin ornaments that you can totally personalize for yourself or friends and family.


How do you make Napkin Ornaments? Watch the video.


Instructions


1. Gather your supplies.


You will need the following:

2. Line up the design. 


Line up the design you want from the napkin onto the wood slice ornament by laying the napkin over the top of the wood slice. You don't have to be precise (unless you have a particular design). 

3. Separate the napkin. 


Paper napkins have more than one ply. Gently rub a corner to get them to separate and then carefully pull it off. Cut it larger than the wood slice.

4. Put a layer of Mod Podge onto the wood slice. 


Use a paintbrush and paint a generous layer of Mod Podge onto the wood slice.

5. Press on the napkin. 


Carefully lay your napkin circle on top of the mod podge wood slice ornament. Use your fingers to press the napkin down and smooth it out. Make sure to press out any wrinkles or bubbles.

**************************************************************************** 

Would you like to help us do reviews? Here's a link to our 

wishlist on Amazon.com. We have items starting as low as $6. 

****************************************************************************

 6. Sand the sides.


I used a fine-grit sand block to sand off the edges of the paper, plus you can see some of the bark of the wood.


7. Mod Podge the top of the napkin. 


Use the paintbrush
 and paint another layer of Mod Podge to the top of the napkin. Cover it completely up to the very edges.


8. Add the hanger.


You will have to push through the paper in order to pull the hanger through the hole.

9. Embellishments. 


Use your imagination on making these ornaments. The sky's the limit!

Do you like to make ornaments? Have you ever made this type of ornament? We'd love to hear from you in the comments below.

Stay sassy,

Kelly

Sassy Silver Sisters

Cathy, Rhonda, and Kelly


🎄🎄🎄🎄🎄🎄🎄🎄🎄🎄🎄🎄🎄🎄


Thank you for reading our blog post. If you haven't already subscribed to receive our weekly blog post and Recipe of the Week, just click the SUBSCRIBE button on the right of the page and you will be the first to find out what's going on in our sassy brains. 😜

The Recipe of the Week is a bonus for our subscribers and goes out via email mid-week.
So, don't miss out, and SUBSCRIBE TODAY!

FTC DISCLAIMER:  This page informs you of our disclosure statement regarding the advertisements we use and disclosure of our Service and the choices we have associated with it. The compensation received will never influence the content, topics, or posts made in this blog. All advertising is in the form of advertisements generated by a third-party ad network or affiliates. Those advertisements will be identified as paid advertisements. The owner(s) of this website is not compensated to provide opinions on products, services, websites, and various other topics. The views and opinions expressed on this website are purely the owners'. If we claim or appear to be experts on a certain topic or product or service area, we will only endorse products or services that we believe, based on our expertise, are worthy of such endorsement. Any product claim, statistic, quote, or other representation about a product or service should be verified with the manufacturer or provider. This website does not contain any content which might present a conflict of interest.


Monday, October 24, 2022

DIY Air-dry Clay Ghost with Tea Lights Craft


We recently made these cute little ghosts using air-dry clay. Great DIY craft for your kids, grandkids, or for yourself, and set them right in there with all your Halloween decorations. 

Here’s what you need:

Instructions:
  1. Roll out a 2-3” ball of clay.
  2. When it’s about 1/4-inch thick, cut out a 4 1/2-inch circle.
  3. Continue to roll the circle until it’s about 6-inches in diameter.
  4.  With the straw or lollipop stick, make two eyes a bit off-center. 
  5. Use the aluminum foil to build a mold to drape the clay circle over the ball. 
  6. Let the ghost dry for up to 48 hours. You may need to turn it over to dry underneath after the first 24 hours.
  7. Rest the ghost over a tea light.
And the final project looks like this...


Below is our 10/19/22 LIVE video with the craft that starts at 20:00.


We hope you enjoyed this little tutorial. Do you decorate for Halloween? Do you make crafts for the holidays? We'd love to hear from you in the comments below.

Keep it sassy,

Kelly

👻👻👻👻👻👻👻👻👻👻👻👻👻👻👻👻👻👻👻👻👻

Thank you for reading our blog post. If you haven't already subscribed to receive our weekly blog post and Recipe of the Week, just click the SUBSCRIBE button on the right of the page and you will be the first to find out what's going on in our sassy brains. 😜  

The Recipe of the Week is a bonus for our subscribers and goes out via email mid-week. So, don't miss out, and SUBSCRIBE TODAY!


FTC DISCLAIMER:  This page informs you of our disclosure statement regarding the advertisements we use and disclosure of our Service and the choices we have associated with it. The compensation received will never influence the content, topics, or posts made in this blog. All advertising is in the form of advertisements generated by a third-party ad network or affiliates. Those advertisements will be identified as paid advertisements. The owner(s) of this website is not compensated to provide opinions on products, services, websites, and various other topics. The views and opinions expressed on this website are purely the owners. If we claim or appear to be experts on a certain topic or product or service area, we will only endorse products or services that we believe, based on our expertise, are worthy of such endorsement. Any product claim, statistic, quote, or other representation about a product or service should be verified with the manufacturer or provider. This website does not contain any content which might present a conflict of interest.

Monday, September 12, 2022

Farm Stand Peach Bread Pudding Review

***UPDATED 9/2/23***


INGREDIENTS

  • 4 cups of day-old bread, torn into small pieces.
  • 1 3/4 cup milk
  • 3 Tablespoons salted butter
  • 1 cup sugar, divided
  • 4 medium peaches, peeled and sliced (I used what we had leftover, frozen and canned )
  • 3 large eggs
  • 2 teaspoons vanilla
  • 1 teaspoon ground cinnamon
  • Dash of ground nutmeg

PEACH BUTTER SAUCE

  • Reserved peach juice
  • 1/4 cup light brown sugar
  • 1/4 cup heavy whipping cream ( I forgot that part but it was so good anyway)

INSTRUCTIONS

  1. Preheat the oven to 350.
  2. In a medium-sized bowl, add the torn bread. Pour the milk over the bread and let sit, occasionally stirring for 15 minutes. Meanwhile, in a small bowl, whisk the eggs. Add the 1/2 cup sugar, vanilla, cinnamon, and nutmeg, and whisk to combine. Add the egg mixture to the bread mixture. Set aside.
  3. In a skillet, melt the butter, and add the sliced peaches and 1/2 cup sugar. Bring to a boil and simmer for 3 minutes. Drain the juice with a fine mesh strainer and RESERVE juice. Add the strained peaches to the egg and bread mixture, and stir to combine.
  4. Spray a 2-quart baking dish with nonstick spray. Add the bread pudding to the baking dish and bake for 40 minutes or until the middle is set. If desired, sprinkle with sugar during the last 5 minutes of baking and broil the top till well browned for some crispy crunchy bites!
MAKE THE PEACH BUTTER SAUCE 
Add all the peach butter sauce ingredients to the same skillet and bring to a boil, boil for 3 minutes. Transfer to a dish and let cool till warm. 

TO SERVE: Serve in small dishes and ladle on peach butter sauce. Enjoy! Notes: You can double his recipe and use a 9x13 baking dish. I also made it in individual 6-ounce ramekins!
( I added the sauce over top of the whole dish. )


I put the pictures in a collage of each step. 


Watch a video here from The Farm Stand


REVIEW
This was so good! Not difficult. I gave some to everyone at Mom's house and they loved it. They wanted vanilla ice cream to go with it! So next time you want something different, try this!

Stay sassy,

Cathy

Sassy Silver Sisters
Cathy, Rhonda, and Kelly
 

😃😃😃😃😃😃😃😃😃😃😃😃😃😃😃😃

Thank you for reading our blog post. If you haven't already subscribed to receive our weekly blog post and Recipe of the Week, just click the SUBSCRIBE button on the right of the page and you will be the first to find out what's going on in our sassy brains. 😜


The Recipe of the Week is a bonus for our subscribers and goes out via email mid-week.
So, don't miss out, and SUBSCRIBE TODAY!

FTC DISCLAIMER:  This page informs you of our disclosure statement regarding the advertisements we use and disclosure of our Service and the choices we have associated with it. The compensation received will never influence the content, topics, or posts made in this blog. All advertising is in the form of advertisements generated by a third-party ad network or affiliates. Those advertisements will be identified as paid advertisements. The owner(s) of this website is not compensated to provide opinions on products, services, websites, and various other topics. The views and opinions expressed on this website are purely the owners. If we claim or appear to be experts on a certain topic or product or service area, we will only endorse products or services that we believe, based on our expertise, are worthy of such endorsement. Any product claim, statistic, quote, or other representation about a product or service should be verified with the manufacturer or provider. This website does not contain any content which might present a conflict of interest.

Monday, June 20, 2022

Taste of Home Bakeable's June 2022 Challenge: Vanilla Cream Fruit Tart ***UPDATED

***UPDATED 6/25/23***

I've taken on the challenge of the Taste of Home Bakeable's Challenge. For the month of June, it's the Vanilla Cream Fruit Tart.

This recipe calls for a 12” pizza pan but since I had decided to cut the recipe in half, I used a 9” pie pan. 

What’s wonderful about a fruit tart is you can use whatever fruit your heart desires. I used strawberries, blueberries, kiwis, and mandarin oranges. 

If you plan on keeping your fruit tart longer than a day, consider coating the crust with a thin layer of melted chocolate—it can be white, semisweet, milk, or dark chocolate—prior to filling. Not only does it coat the crust and keep it from absorbing moisture, but it also adds an additional "surprise" element of flavor! 

 This fruit & cream tart is easier than making a classic summer pie but fancier than a down-home fruit cobbler. It looks dramatic, elegant, and downright impressive, but it's actually simple to make. Sounds good, right


Vanilla Cream Fruit Tart

TOTAL TIME: Prep: 25 min. Bake: 25 min. + chilling  YIELD: 12 servings.

Ingredients

  • 3/4 cup butter, softened
  • 1/2 cup confectioners' sugar
  • 1 1.2 cups all-purpose flour
  • 1 pkg (10-12 oz) white baking chips, melted and cooled
  • 1/4 cup heavy whipping cream
  • 1 pkg (8 oz) cream cheese, softened
  • 1/2 cup pineapple juice
  • 1/4 cup sugar
  • 1 T. cornstarch
  • 1/2 tsp lemon juice
  • 4 cups fresh fruit
Directions
Preheat the oven to 300°. Cream butter and confectioners' sugar until light and fluffy.
Beat in flour (mixture will be crumbly).


Pat onto a greased 12-inch. pizza pan. Bake until lightly browned, 25-28 minutes. Cool.

(I used extra chips to melt on top on top of the crust to keep it from getting soggy).


Beat melted chips and cream until smooth. Beat in cream cheese until smooth.


Spread over crust. Refrigerate for 30 minutes.


Meanwhile, in a small saucepan, combine pineapple juice, granulated sugar, cornstarch, and lemon juice.


Bring to a boil over medium heat; cook and stir until thickened, about 2 minutes. Cool.


Arrange fruit over the cream cheese layer; brush with pineapple mixture. Refrigerate 1 hour before serving.


Have you ever made a fruit tart? What is your favorite fruit to use? We would love to hear from you in the comments below.


Keep it sassy,
Kelly
Sassy Silver Sisters

😊😊😊😊😊😊😊😊😊😊😊😊😊😊😊😊

Thank you for reading our blog post. If you haven't already subscribed to receive our weekly blog post and Recipe of the Week, just click the SUBSCRIBE button on the right of the page and you will be the first to find out what's going on in our sassy brains. 😜

The Recipe of the Week is a bonus for our subscribers and goes out via email mid-week.
So, don't miss out, and SUBSCRIBE TODAY!

FTC DISCLAIMER:  This page informs you of our disclosure statement regarding the advertisements we use and disclosure of our Service and the choices we have associated with it. The compensation received will never influence the content, topics, or posts made in this blog. All advertising is in the form of advertisements generated by a third-party ad network or affiliates. Those advertisements will be identified as paid advertisements. The owner(s) of this website is not compensated to provide opinions on products, services, websites, and various other topics. The views and opinions expressed on this website are purely the owners. If we claim or appear to be experts on a certain topic or product or service area, we will only endorse products or services that we believe, based on our expertise, are worthy of such endorsement. Any product claim, statistic, quote, or other representation about a product or service should be verified with the manufacturer or provider. This website does not contain any content which might present a conflict of interest.

Monday, February 14, 2022

DIY Laundry Room Sign


I don't have a fancy laundry room. It's in a storage area in the unfinished part of our basement. As I was cleaning up the area, I thought I would like to put a small sign just to spruce it up a bit.

Looking on the internet, I saw this cute sign (below) that caught my attention. I really didn't want to spend $20 on a little sign and then thinking about it, I thought why not make it myself.


Hobby Lobby was my first thought to find an unfinished wood sign and I was correct, they did have something I liked and it was only $2. I had everything else in my arsenal of crafts to make it.

If you are interested in making one similar, here's what you need:

Instructions:

  • The first thing you need to do is get out all your supplies and get organized.


  • Paint the sign and let it dry.


  • Decide what font & size you want to use on your sign.


  • Use the tools to pick up the excess vinyl. Then use the transfer paper to transfer the cut words.
  • Line up the transfer paper onto the sing board, make sure you eyeball it before setting it down or it may have problems getting it to come off. Use the scraper tool to help adhere the letters on the board. Pull off the transfer paper, and don't throw it away, you can use it again for another project.

  • To hang it, you can drill holes on either side, attach it with some jute string and hang it on the wall or wherever you would like to put it. I decided to hot glue it to the shelf, at least for now.

Voila! You have a sign. 


The sign may have cost me $5 to make plus I had fun making it.

I hope you enjoyed my little tutorial on making a laundry room sign. Do you have a crafting machine that you use? What brand and do you use it much? We would love to hear from you.

Please comment below 👇 


Stay warm and sassy, 
Kelly
Sassy Silver Sisters 
Cathy, Rhonda & Kelly

💗💗💗💗💗💗💗💗💗💗💗💗💗💗💗💗

Thank you for following us and if you haven't already subscribed to receive our weekly blog post, just click on the SUBSCRIBE button on the left of this page or the pop-up form and you will be the first to find out what's going on in our sassy brains. 😉

Also, if you are interested in getting a weekly recipe, that has been tested and approved by one of us sisters, all you have to do is sign up to our blog and you will automatically receive a weekly recipe. Pass the word along 🍲

FTC DISCLAIMER: This blog post is NOT SPONSORED. All opinions are our own, honest opinions. The links are for easy access & if you choose to use these links we are in no way compensated. Photos come from Taste of Home.


Monday, January 17, 2022

10 Easy Life Hacks to Organize Your Home

***UPDATED 3/13/24***


I start the new year by each day doing something to organize my home. Sundays I do NO housework. Everyone needs a day of rest. I feel so much better when I've completed the task, I wish the organization would magically stay organized. That would FANTASTIC!

This blog post is all about organizing your home with easy life hacks.

Let's do it together and simplify our lives. Are you with me??

Here we go...

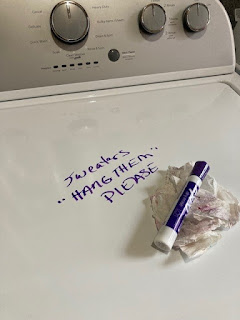
  • Write Notes on the Washer 


Amazon.com

Stop shrinking your sweaters! When you put a load of clothes into your washing machine, use a dry-erase marker to note on the lid which items should not go into the dryer. That way, whoever switches the load from the washing machine to the dryer will know which items to leave out for line drying. And believe me, if you have others helping you with the laundry like I do, this is a great tip. 


The enamel finish on most washing machine lids is like a whiteboard, and dry-erase markers can be removed easily with a dry paper towel. ***MAKE SURE YOU DO A TEST ON AN AREA YOU DON'T CARE ABOUT IN CASE IT MIGHT STAIN***


  • Remember Your Keys!


You’ll always know where your keys are with this handy hint! My grandson, who lives with us, would get a kick out of this and he would love to help put up the keys.

To make Lego keychains:

  1. Start by drilling a hole into the base of a Lego that is slightly smaller than the screw portion of an eyelet screw.
  2. Next, wind the eyelet screw into the Lego. Thread a split ring through the hole and use it to attach keys.
  3. Mount the Lego board to a surface using your preferred method. In this case, we mounted our Lego plate to the wall in our mudroom.
  4. Attach the Lego board to the wall by first marking the desired location for the board and making sure that it is level.
  5. Drill pilot holes in the four corners of the Lego board and into the wall.
  6. To finish, drill screws with small enough heads to fit in between the Lego pegs into the board.

·                    Bathroom Drawer Insert from the Kitchen

Bulk Plastic Flatware Storage Trays | Dollar Tree


Cabinets and drawers in the bathroom can become cluttered and disorganized very quickly because of all the small items that need to be stored there. To keep bathroom drawers neat and organized, look no further than the kitchen! You can use a silverware drawer insert to organize a bathroom drawer, too.

The long compartments in a silverware organizer are the perfect size for storing toothbrushes and tubes of toothpaste. Medium-size compartments are great for disposable razors or clippers, and the small compartments work well for corralling lip balm, floss containers, etc.

·                    Use Magnets

DollarTree.com


A handy way to store small metal items such as nail clippers, tweezers, etc., in a bathroom cabinet is to simply stick a few magnets to the back of the cabinet or inside the cabinet door for holding the items. Then they’ll be organized and in plain sight when you need them.

If your cabinet is not metal, you may need to use a bit of double-sided tape or hot glue to mount the magnets where you want them. Be sure to use the inexpensive gray disc magnets, as the expensive neodymium magnets do not want to let go of your items! — David Farrand

·                    Organize Cleaning Supplies

Walmart.com


It can be difficult to keep spray bottles and other cleaning supplies from falling over and making a mess under your kitchen sink. To keep your cleaning supplies upright, hang them from a short tension rod inside your cabinet. Another clever idea is to slide a paper towel roll through the tension rod for easy access. This is also a great place to hang dish-drying towels and rubber cleaning gloves.

·                    File Folders for Kitchen Organization

Dollar Tree


File folders can be used for more than just organizing paper and magazines in your office.  They can also be used for organization in your kitchen.

Place all of your kitchen cleaning supplies into file folders, putting the most frequently used items towards the front. This hack is so easy and satisfying!

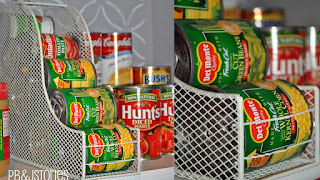
·                    Use Magazine File Holders for Storage


Magazine files can be used to store canned food and other objects. They come in all different designs and materials, and if you want to get take your organizing up a notch, you can label them.

 **************************************************************************** 

Would you like to help us do reviews? Here's a link to our 

wishlist on Amazon.com. We have items starting as low as $6. 

****************************************************************************

·                    No-Slip Kitchen Towels

VELCRO Brand Sticky Back for Fabric

Hanging a dish towel from an oven or dishwasher door makes sense. The towel is in a convenient location, and the oven’s warmth quickly gets rid of dampness. However, the one drawback with hanging your towels here is that they are constantly falling off!

Here’s a way to keep the towel from slipping off:

  1. Fold your towel into its desired form and attach Velcro strips in two spots, one on the front and one on the back, as shown in the photo.
  2. Stitch in place or use fabric iron-on Velcro strips and follow the directions on the packaging.
  3. Finally, hang your towel from the oven or dishwasher door and match Velcro ends together. No more towels on the floor!

·                    Picture Frame Message Board


Dry-erase message boards can be pretty unattractive. So, make a message board using a nice picture frame. To make these message boards, grab a picture frame and some paper. Cut the paper to fit the frame and set it behind the glass. The glass makes an excellent dry-erase surface! — Jessie Dawson


·                     Cami or Scarf Organization 


This hanger tip will help you to save a lot of closet space by consolidating multiple camis or scarves on one hanger.


iDesign Classico Over the Rod


Thanks to Family Handyman and Tiffany from Dream Design DIY for the great tips.


👉Do you have any organizational tips you'd like to share with us? We'd love to hear from you. Comment below 👇


Keep it sassy,
Kelly

🥀🥀🥀🥀🥀🥀🥀🥀🥀🥀🥀🥀🥀🥀🥀🥀🥀🥀🥀🥀

Thank you so much for taking the time to read our blog! We really appreciate it. We believe that our blog is a great way to share valuable information, such as tips, tricks, and advice, to help our readers improve their lives. We strive to create content that is interesting, informative, and entertaining so that our readers can always find something valuable to read. We do our best to provide content that is timely and relevant, so our readers can stay up to date with the latest trends. We also aim to provide content that is unique and engaging, so our readers can learn something new and be inspired. We hope that our blog provides you with the necessary information and resources to make your life easier and more enjoyable. Thank you again for taking the time to read our blog!

FTC DISCLAIMER:  This page informs you of our disclosure statement regarding the advertisements we use and disclosure of our Service and the choices we have associated with it. The compensation received will never influence the content, topics, or posts made in this blog. All advertising is in the form of advertisements generated by a third-party ad network or affiliates. Those advertisements will be identified as paid advertisements. The owner(s) of this website is not compensated to provide opinions on products, services, websites, and various other topics. The views and opinions expressed on this website are purely the owners. If we claim or appear to be experts on a certain topic or product or service area, we will only endorse products or services that we believe, based on our expertise, are worthy of such endorsement. Any product claim, statistic, quote, or other representation about a product or service should be verified with the manufacturer or provider. This website does not contain any content which might present a conflict of interest.

Aging Gracefully: Embracing the Journey with Wisdom and Resilience

Growing old isn't for wimps, but with a little humor, we can laugh in the face of wrinkles! Aging is an inevitable part of life, and I t...